From Scan to Smile: The Journey of a 3D Printed Dental Restoration
Have you ever wondered what happens between the moment your dentist scans your teeth and when they place your new crown, bridge, or veneer? The journey of a modern dental restoration is a fascinating blend of digital technology, materials science, and clinical expertise that has revolutionized how we restore teeth. As someone who’s witnessed this transformation firsthand, I can tell you that today’s 3D printed dental restorations represent one of the most significant advances in dental care in decades.
In this article, we’ll follow the remarkable journey of a 3D printed dental restoration—from the initial digital scan to the moment you walk out of the dental office with your new smile. Along the way, we’ll explore how this technology is making dental care faster, more precise, and often more affordable than ever before.
The Evolution of Dental Restorations
Traditional vs. Digital: A Brief Comparison
Before diving into the 3D printing process, it’s worth understanding how dramatically things have changed:
Traditional Restoration Process:
- Physical impressions using impression material
- Stone model creation
- Manual wax-up of the restoration
- Investment and casting/pressing
- Manual finishing and adjustments
- Multiple appointments over 2-3 weeks
Digital 3D Printed Restoration Process:
- Digital scanning of the teeth
- Computer-aided design (CAD)
- 3D printing of the restoration
- Post-processing and finishing
- Placement—often in a single appointment
According to AMFG, the dental 3D printing market is predicted to hit $50.1 billion by 2033, growing at a CAGR of 18.96% in 2025. This explosive growth reflects the transformative impact of this technology on dental care.
Stage 1: Digital Impression – Capturing Your Unique Dental Anatomy
The Scanning Process
The journey begins with a digital impression of your teeth:
How it works:
- A small, handheld intraoral scanner captures thousands of images of your teeth
- Advanced software stitches these images together to create a precise 3D model
- The entire process typically takes just 2-5 minutes per arch
- No messy impression materials or gagging sensation
Digital Dental Studio notes that intraoral scanning captures precise 3D images of a patient’s teeth, providing a level of detail that traditional impressions often miss.
Types of Scanners
Several types of digital scanning technologies are used in modern dentistry:
- Optical scanners: Use light to capture surface detail
- Laser scanners: Use laser technology for high precision
- Photogrammetry-based systems: Use multiple photographs to create 3D models
- Cone Beam CT (CBCT): For cases requiring bone and soft tissue imaging
According to iFun3D, intraoral scanning is fast and accurate for capturing the shape and dimensions of teeth, while CBCT scans provide detailed three-dimensional views for complex cases.
Data Processing
Once captured, the scan data undergoes initial processing:
- Removal of artifacts and unwanted data
- Identification of the preparation margins
- Alignment with opposing teeth and bite registration
- Creation of a virtual articulation of your bite
This digital model serves as the foundation for designing your custom restoration.
Stage 2: Digital Design – Crafting Your Perfect Restoration
Computer-Aided Design (CAD)
With the digital model complete, your dentist or a dental technician designs your restoration using specialized CAD software:
Design considerations:
- Precise fit to your prepared tooth
- Proper contact with adjacent teeth
- Optimal occlusion (bite) with opposing teeth
- Appropriate contours and emergence profile
- Aesthetic considerations like shape and color
Institute of Digital Dentistry explains that CAD software like exocad allows dentists to design crown restorations with consideration for bite alignment, adjacent teeth, and aesthetics before exporting the design as an STL file.
Material Selection
Based on your specific needs, the appropriate material is selected:
Common materials for 3D printed restorations:
- Hybrid ceramic resins: Combine strength and aesthetics
- Nano-ceramic composites: Offer excellent wear resistance
- High-performance polymers: For long-term temporaries
- Zirconia-infused resins: Balance strength and aesthetics
According to 3DPrint.com, significant advancements in dental-specific materials like BEGO™ VarseoSmile® TriniQ® Resin and Formlabs’ Premium Teeth Resin have expanded capabilities in producing implant crowns and natural-looking denture teeth.
Design Verification
Before proceeding to printing, the design undergoes verification:
- Virtual analysis of contact points and occlusion
- Thickness checks to ensure structural integrity
- Review of marginal fit and adaptation
- Final adjustments based on aesthetic and functional requirements
This digital verification process helps prevent issues before the physical restoration is created.
Stage 3: 3D Printing – Bringing Your Restoration to Life
Printer Setup and Preparation
With the design finalized, preparation for printing begins:
Setup process:
- Selection of the appropriate printer for the restoration type
- Loading the specific dental resin for your restoration
- Calibration and verification of printer settings
- Orientation of the design for optimal printing results
Dental Proto3000 describes how this stage includes inserting a resin tank, a resin cartridge, and the printer’s build platform, followed by selecting the correct file from the printer’s job queue.
Printing Technologies
Several 3D printing technologies are used for dental restorations:
- Stereolithography (SLA): Uses a laser to cure liquid resin
- Digital Light Processing (DLP): Projects light patterns to cure resin
- Continuous Liquid Interface Production (CLIP): Enables faster printing with minimal layering
- MultiJet Printing (MJP): Allows for multi-material and multi-color printing
Advanced Dental Export notes that high-speed printing technologies like CLIP and DLP significantly reduce production times for dental restorations.
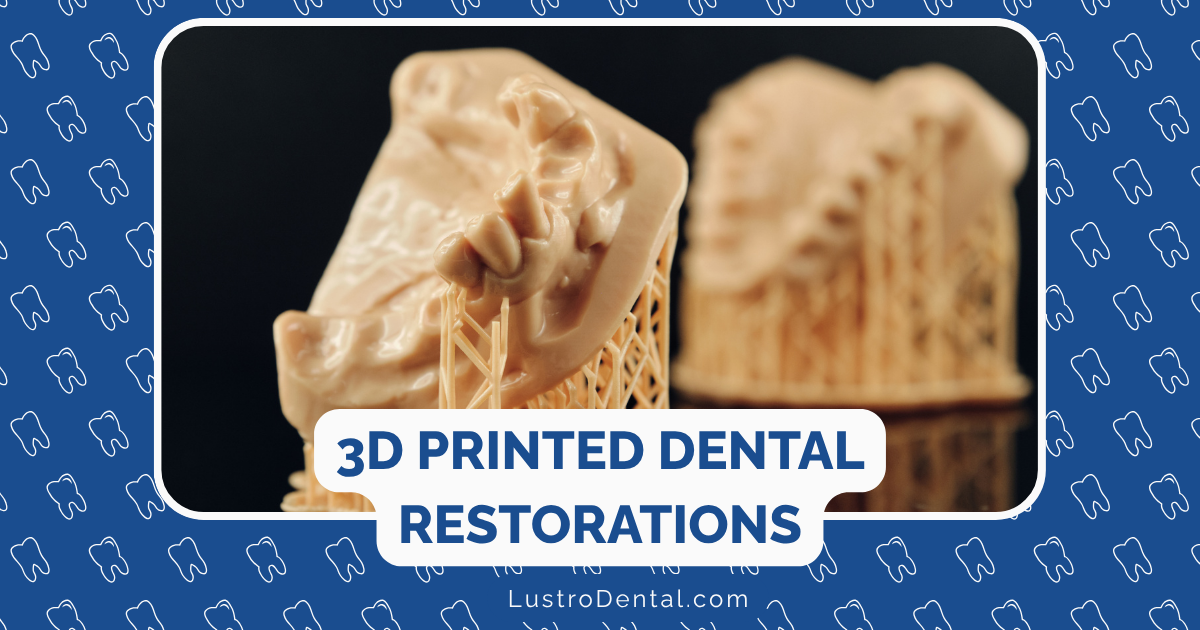
The Printing Process
During printing, your restoration takes physical form:
How it works:
- The printer builds the restoration layer by layer, with each layer as thin as 25-100 microns
- For a typical crown, the printing process takes approximately 15-30 minutes
- The restoration is built with temporary supports that hold it in place during printing
- The printer maintains precise temperature and environmental conditions for optimal results
According to Institute of Digital Dentistry, printing a dental crown using a SprintRay Pro 55S takes approximately 17 minutes to complete.
Stage 4: Post-Processing – Refining Your Restoration
Cleaning and Initial Processing
Once printing is complete, the restoration undergoes initial processing:
Cleaning steps:
- Removal from the printer build platform
- Cleaning of uncured resin using isopropyl alcohol or specialized cleaning solutions
- Gentle air drying to prepare for curing
- Inspection for any printing defects or residual resin
Formlabs Dental recommends washing printed parts in isopropyl alcohol (≥99%) to remove uncured resin, followed by air drying for at least 30 minutes.
Curing
The cleaned restoration then undergoes curing to achieve final hardness and properties:
Curing process:
- Placement in a specialized UV curing unit
- Exposure to specific wavelengths of light for a predetermined time
- Often involves multiple curing cycles from different angles
- May include heat treatment for optimal material properties
Institute of Digital Dentistry notes that curing a printed crown under UV lights takes approximately 9 minutes with the SprintRay Pro Cure 2.
Finishing and Polishing
The final steps before placement involve detailed finishing:
Finishing process:
- Removal of support structures
- Refinement of margins and contours
- Polishing to achieve the desired surface texture
- Color characterization and glazing for aesthetic restorations
According to Phrozen Dental, post-processing includes removing the model from the building plate, cleaning it in an ultrasonic cleaner, drying it, and post-curing to ensure proper hardening.
Stage 5: Clinical Placement – Completing Your Smile Transformation
Try-In and Adjustment
Before final placement, your restoration undergoes a careful evaluation:
Try-in process:
- Verification of fit on the prepared tooth
- Checking contacts with adjacent teeth
- Evaluation of occlusion with opposing teeth
- Assessment of margins and emergence profile
- Confirmation of color match and aesthetics
Minor adjustments can be made chairside to ensure perfect fit and function.
Bonding or Cementing
With adjustments complete, the restoration is permanently placed:
Placement process:
- Cleaning and preparation of your tooth
- Application of appropriate bonding agents or cement
- Precise positioning of the restoration
- Light curing or setting time for the cement
- Final cleanup and occlusal verification
Formlabs Dental notes that finished restorations can be attached using conventional temporary cements for up to 12 months.
Final Verification
Before you leave, your dentist performs final checks:
- Confirmation of proper seating and fit
- Verification of occlusion in various jaw movements
- Assessment of aesthetics from multiple angles
- Instructions for care and maintenance
And with that, your journey from digital scan to new smile is complete!
The Benefits of 3D Printed Dental Restorations
Time Efficiency
One of the most significant advantages is the dramatic reduction in treatment time:
- Same-day treatment: Many restorations can be completed in a single appointment
- Reduced chair time: Digital processes are often faster than traditional methods
- Fewer appointments: Eliminating the need for multiple visits
- Immediate results: Walking out with your final restoration rather than a temporary
AMFG highlights that same-day dentistry eliminates the need for multiple visits and external lab fabrication, allowing patients to receive restorations within a single appointment.
Enhanced Precision and Fit
Digital workflows improve accuracy throughout the process:
- Micron-level precision: Digital scanning and printing achieve extremely fine detail
- Consistent results: Reduced variability compared to manual processes
- Better adaptation: Improved marginal fit and reduced gaps
- Fewer adjustments: More precise fit means less chairside modification
iFun3D notes that 3D printed crowns offer micron-level precision, resulting in a superior fit and minimizing the need for chairside adjustments.
Improved Aesthetics
3D printing enables superior aesthetic outcomes:
- Natural appearance: Advanced materials mimic the translucency and color of natural teeth
- Customization: Precise control over shape, contour, and characterization
- Color matching: Ability to create restorations that blend seamlessly with adjacent teeth
- Surface texture: Replication of natural tooth surface characteristics
Cost Efficiency
The digital workflow often translates to cost benefits:
- Reduced material waste: Additive manufacturing uses only the material needed
- Lower labor costs: Less hands-on time required for fabrication
- Fewer appointments: Saving time and resources for both patient and practice
- Longer-lasting results: Precise fit can contribute to better longevity
3DPrint.com reports that materials for 3D printing in dentistry can cost 10 to 30 times less than traditional milling blocks, making the process more cost-effective.
The Future of 3D Printed Dental Restorations
Emerging Technologies
The field continues to evolve rapidly:
- AI-assisted design: Artificial intelligence helping to optimize restoration design
- Bioprinting: Potential for printing with living cells for tissue regeneration
- Multi-material printing: Creating restorations with varying properties in different areas
- Chairside metal printing: Direct printing of metal restorations in the dental office
Advanced Dental Export mentions that bioprinting is being explored for developing 3D-printed bone grafts and biocompatible implants that integrate with the patient’s anatomy.
Expanding Applications
The range of 3D printed dental applications continues to grow:
- Full-arch rehabilitations: Complete smile transformations
- Implant components: Custom abutments and surgical guides
- Orthodontic devices: Clear aligners and retainers
- Maxillofacial prosthetics: Facial and oral reconstructions
Integration with Other Digital Technologies
3D printing is increasingly part of a comprehensive digital ecosystem:
- AI diagnostics: Identifying issues before they require restoration
- Digital smile design: Previewing aesthetic outcomes before treatment
- Augmented reality: Visualizing restorations in real-time
- Remote monitoring: Tracking restoration performance over time
Conclusion: The Transformed Dental Experience
The journey of a 3D printed dental restoration represents more than just technological advancement—it’s a fundamental transformation of the dental experience. From the comfort of digital impressions to the convenience of same-day treatment, this revolution is making dental care more accessible, efficient, and effective.
As we look toward the future, the integration of 3D printing with other digital technologies promises even more remarkable possibilities. The days of multiple appointments, uncomfortable impressions, and long waits for dental restorations are rapidly becoming a thing of the past.
Whether you need a simple crown or a complete smile makeover, the journey from scan to smile has never been more streamlined or predictable. And that’s something worth smiling about.
Have you experienced a 3D printed dental restoration? How did it compare to traditional methods? Share your experience in the comments below!